Are you using Elementor to its full potential? Many websites built with this powerful page builder look great but fail to convert visitors into paying customers. The secret to unlocking significant revenue growth lies in strategically crafting a high-converting sales funnel. A well-planned funnel guides your audience through a series of touchpoints, nurturing their interest and leading them toward a purchase.
This guide dives deep into how to leverage Elementor’s features and flexibility to create sales funnels that not only attract visitors but also convert them into loyal customers. We’ll cover everything from planning your funnel to optimizing key pages and widgets for maximum impact, ensuring you’re not leaving money on the table.
Stop Leaving Money on the Table: Turn Your Elementor Site into a Conversion Machine
The Problem with Most Elementor Websites (and How to Fix It)
Many Elementor websites suffer from a lack of strategic planning. They focus on aesthetics but neglect the user journey. Visitors often land on a page without a clear path to follow, resulting in high bounce rates and low conversion rates. This often happens when individual pages are designed in isolation, without considering how they contribute to a larger sales process. The fix is to adopt a funnel-driven approach, carefully mapping out each stage of the customer journey and designing pages that seamlessly guide visitors from one stage to the next. Without a clear call to action or understanding of the visitor’s intent, even the most visually appealing sites can fail to deliver results. Don’t let a great design go to waste – prioritize conversion optimization from the outset.
Understanding the Power of a Well-Designed Sales Funnel
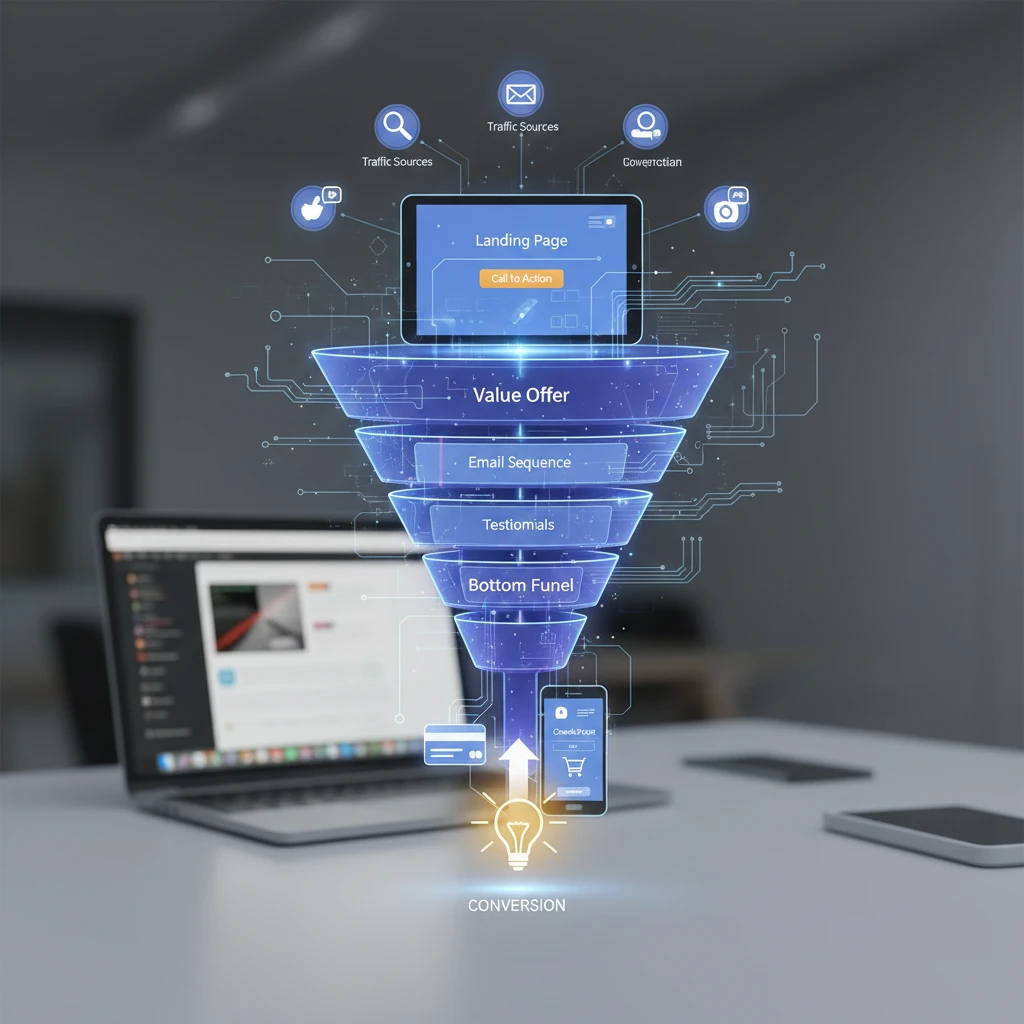
A sales funnel is a visual representation of the path a potential customer takes from initial awareness to becoming a paying client. It’s typically divided into stages like Awareness, Interest, Decision, and Action (AIDA). A well-designed funnel optimizes each stage to maximize conversions. For example, the Awareness stage might involve blog posts, social media content, or paid ads designed to attract attention. The Interest stage could feature lead magnets, webinars, or case studies that educate and engage potential customers. The Decision stage often includes sales pages, product demos, or free trials designed to convince prospects of your product’s value. Finally, the Action stage simplifies the purchasing process and encourages immediate sales. By understanding and optimizing each stage, you can significantly improve your conversion rates and generate more revenue.
Why Elementor is Perfect for Building Sales Funnels
Elementor’s drag-and-drop interface and extensive widget library make it an ideal tool for building sales funnels. Its visual editor allows you to quickly create and customize pages without coding, giving you full control over the design and layout. Elementor’s pre-built templates provide a starting point for various funnel stages, saving you time and effort. Furthermore, its integration with popular marketing tools like Mailchimp and ActiveCampaign simplifies lead capture and email marketing automation. The ability to use dynamic content, covered in detail in this article on Elementor Dynamic Content, personalizes the user experience and improves engagement. With Elementor, you can create a visually appealing and highly functional sales funnel that drives results. Elementor’s flexibility also allows for A/B testing, crucial for continuous funnel optimization.
Planning Your High-Converting Elementor Sales Funnel: The Foundation for Success

Define Your Target Audience and Ideal Customer Profile
Before building your sales funnel, you must clearly define your target audience and ideal customer profile (ICP). Understanding who you’re trying to reach is crucial for crafting effective messaging and designing relevant offers. Consider factors like demographics (age, gender, location), psychographics (interests, values, lifestyle), and behavior (online habits, purchasing patterns). An ICP goes a step further by defining the perfect customer—the one who will derive the most value from your product or service and be most likely to become a long-term, loyal customer. Clearly defining these aspects enables you to tailor your content, design, and marketing efforts for maximum impact. For CopyElement, our ideal customer might be a freelance web designer looking for pre-built sections to speed up their workflow and deliver projects faster. Without a clear ICP, you risk wasting time and resources on unqualified leads.
Map Out Your Customer Journey: Awareness, Interest, Decision, Action
Mapping out your customer journey involves visualizing the steps a potential customer takes from discovering your brand to making a purchase and beyond. Start by identifying the key touchpoints where customers interact with your brand, such as blog posts, social media ads, landing pages, sales pages, and email campaigns. For each touchpoint, consider the customer’s needs, questions, and concerns. What information are they seeking? What are their pain points? How can you address their objections? The AIDA framework (Awareness, Interest, Decision, Action) provides a useful structure for mapping the customer journey. By understanding the customer’s perspective at each stage, you can design a funnel that seamlessly guides them towards a purchase. For instance, after reading a blog post about Elementor image optimization, a user might be interested in a lead magnet offering a checklist for Elementor Image Optimization.
Set Clear Goals and Key Performance Indicators (KPIs)
Setting clear goals and KPIs is essential for measuring the success of your sales funnel. Define what you want to achieve, such as increasing lead generation, boosting conversion rates, or driving more sales. Then, identify the KPIs that will help you track your progress. Common KPIs for sales funnels include website traffic, bounce rate, conversion rate (lead-to-customer), customer acquisition cost (CAC), and customer lifetime value (CLTV). Establish baseline metrics and set realistic targets for improvement. Regularly monitor your KPIs and analyze the data to identify areas for optimization. Are visitors dropping off at a particular stage of the funnel? Is your conversion rate lower than expected? Use this information to make data-driven decisions and continuously improve your funnel’s performance. Without clear goals and KPIs, you’re essentially flying blind. For example, if your goal is to increase conversions by 20%, your KPI might be the percentage of landing page visitors who sign up for a trial.
Essential Elementor Pages for Your Sales Funnel: From Landing Page to Thank You
Crafting a Compelling Landing Page That Grabs Attention
Your landing page is often the first impression potential customers have of your brand, so it needs to be impactful. A compelling landing page should immediately grab the visitor’s attention with a clear and concise headline that communicates the value proposition. Use high-quality images or videos to showcase your product or service. Highlight the key benefits and features, focusing on how they solve the customer’s problem. Include a strong call-to-action (CTA) that tells visitors exactly what you want them to do, such as “Get Started,” “Download Now,” or “Sign Up.” Keep the design clean and uncluttered, making it easy for visitors to focus on the message and the CTA. Ensure your landing page is mobile-responsive and loads quickly. Use A/B testing to experiment with different headlines, images, and CTAs to optimize for conversion. A great landing page is not just visually appealing but also strategically designed to convert visitors into leads.
Designing Effective Sales Pages That Convert Visitors to Buyers
The purpose of a sales page is to convince visitors to purchase your product or service. Start by reiterating the problem your product solves and highlighting the benefits it offers. Use persuasive copywriting techniques to build trust and credibility. Include social proof, such as testimonials, case studies, and reviews, to demonstrate the value of your product. Address any potential objections or concerns that visitors may have. Use a clear and concise call to action, making it easy for visitors to complete the purchase. Incorporate high-quality images or videos to showcase your product in action. Consider using a long-form sales page for complex or high-priced products, providing detailed information and addressing every possible question. For simpler products, a shorter sales page may suffice. Ensure your sales page is mobile-responsive and loads quickly. Use a tool like Google Analytics to track key metrics, such as conversion rates and average order value, and make data-driven optimizations. For example, CopyElement might showcase website templates with a video walkthrough on the sales page.
Creating a Seamless Checkout Process with Elementor
A seamless checkout process is crucial for maximizing conversions. A complicated or confusing checkout process can lead to abandoned carts and lost sales. Simplify the checkout process by minimizing the number of steps required to complete a purchase. Offer multiple payment options, such as credit cards, PayPal, and Stripe, to cater to different customer preferences. Ensure your checkout page is secure and trustworthy, displaying security badges and SSL certificates. Use clear and concise language, avoiding jargon or technical terms. Provide customers with clear instructions and guidance throughout the checkout process. Offer guest checkout options to reduce friction. Optimize your checkout page for mobile devices. Regularly test your checkout process to identify and fix any issues. By creating a smooth and user-friendly checkout experience, you can significantly reduce cart abandonment rates and increase sales. You might also consider offering one-click checkout options for returning customers.
The Importance of a Thank You Page: Building Relationships and Encouraging Further Action
The thank you page is often overlooked, but it’s a valuable opportunity to build relationships and encourage further action. After a customer makes a purchase or signs up for your email list, redirect them to a thank you page that expresses your gratitude. Use this page to reinforce their decision and provide them with clear instructions on what to expect next. For example, if they purchased a product, provide them with shipping information and tracking details. If they signed up for your email list, encourage them to confirm their subscription. You can also use the thank you page to promote related products or services, offer a discount code for future purchases, or encourage them to follow you on social media. The thank you page is not just a formality; it’s a chance to build trust, foster loyalty, and drive additional revenue. A simple “Thank you for your order!” is insufficient; provide value and continue the conversation.
Leveraging Elementor Widgets to Maximize Conversion Rates
Using Elementor’s Call-to-Action Widgets Effectively
Elementor’s Call-to-Action (CTA) widgets are powerful tools for driving conversions. These widgets allow you to create visually appealing and attention-grabbing CTAs that encourage visitors to take action. Use clear and concise language that tells visitors exactly what you want them to do. Choose a visually appealing design that stands out from the rest of the page. Use contrasting colors to make the CTA button more prominent. Place CTAs strategically throughout your sales funnel, such as on landing pages, sales pages, and blog posts. Experiment with different CTA designs, colors, and text to see what works best for your audience. Ensure your CTAs are mobile-responsive and load quickly. Track the performance of your CTAs using analytics tools to identify areas for improvement. A/B testing is crucial to optimize your CTAs for maximum impact. For example, test different button colors, such as green versus orange, to see which one generates more clicks. Avoid generic phrases like “Click Here”; use more specific and compelling CTAs, such as “Get Your Free Guide Now.”
Embedding High-Converting Forms for Lead Generation
Forms are essential for capturing leads and building your email list. Elementor’s form widget allows you to easily create and embed high-converting forms on your website. Keep your forms short and simple, asking only for essential information. Use clear and concise labels for each form field. Provide a clear explanation of why you’re collecting the information and how you’ll use it. Offer an incentive for filling out the form, such as a free ebook, a discount code, or a free trial. Use a visually appealing form design that matches your brand. Ensure your forms are mobile-responsive and load quickly. Use a double opt-in process to ensure the quality of your leads. Integrate your forms with your email marketing platform to automate follow-up sequences. Test different form designs and layouts to optimize for conversion. For example, experiment with different button colors and form field arrangements. Remember to comply with data privacy regulations like GDPR when collecting personal information. Using AI-powered content creation, you can also create compelling copy to entice users to fill out your forms.
Adding Testimonials and Social Proof to Build Trust
Testimonials and social proof are powerful tools for building trust and credibility. When potential customers see that others have had positive experiences with your product or service, they’re more likely to make a purchase. Use Elementor’s testimonial widget to showcase positive reviews and feedback from your customers. Include photos of your customers to make the testimonials more authentic. Choose testimonials that highlight the specific benefits of your product or service. Place testimonials strategically throughout your sales funnel, such as on sales pages, landing pages, and checkout pages. Consider using video testimonials for even greater impact. You can also incorporate other forms of social proof, such as customer logos, case studies, and social media mentions. The key is to demonstrate that your product or service is valuable and trustworthy. For example, CopyElement might feature testimonials from freelance web designers who have saved time and improved their workflow using its pre-built sections. Regularly update your testimonials to keep them fresh and relevant. Authenticity is crucial – avoid fake or misleading testimonials.
Utilizing Countdown Timers to Create Urgency
Countdown timers are a proven technique for creating urgency and driving conversions. By setting a deadline for a special offer or promotion, you can encourage visitors to take action before it’s too late. Use Elementor’s countdown timer widget to easily add countdown timers to your website. Choose a visually appealing design that stands out from the rest of the page. Use clear and concise language to explain the offer and the deadline. Place countdown timers strategically throughout your sales funnel, such as on landing pages, sales pages, and email campaigns. Ensure your countdown timers are accurate and reliable. Avoid using fake or misleading countdown timers, as this can damage your credibility. Consider using dynamic countdown timers that adjust based on the user’s location or behavior. For example, you could offer a limited-time discount to visitors who are about to leave your website. Urgency is a powerful motivator, but it’s important to use it ethically and responsibly. Don’t create false scarcity; only use countdown timers for genuine limited-time offers.
Mastering marketing automation can also help implement and optimize time-sensitive offers for better conversions.
Optimizing Your Elementor Sales Funnel for Mobile Devices
In 2026, a significant portion of web traffic originates from mobile devices. Ignoring mobile optimization can lead to substantial losses in potential conversions. A poorly designed mobile experience frustrates users, leading to high bounce rates and lost sales. Ensure your Elementor sales funnel is fully responsive and optimized for mobile users across different screen sizes. Decision criteria should include a focus on touch-friendly design, reduced image sizes, and simplified navigation.
A common pitfall is simply shrinking a desktop layout for mobile, which often results in illegible text and unusable buttons. Instead, prioritize a mobile-first approach, designing the mobile experience before the desktop version. This helps to focus on the core elements and ensures a streamlined user experience. For example, consider using a single-column layout for easier scrolling and larger, more prominent call-to-action (CTA) buttons.
Actionable steps include using Elementor’s responsive editing mode to customize layouts for different screen sizes, optimizing images using tools like ShortPixel or Imagify (or even Elementor’s built-in lazy loading), and ensuring that your forms are easy to fill out on mobile devices. Thorough testing on real mobile devices is essential before launching your funnel.
Ensuring a Responsive Design for Seamless User Experience
Responsive design isn’t just about making your content fit on a smaller screen; it’s about providing a seamless and intuitive user experience regardless of the device. This involves carefully considering the placement of elements, the size of fonts, and the spacing between interactive components. Key elements to consider include:
- Font Size: Ensure text is legible on smaller screens. A minimum font size of 16px is generally recommended for body text.
- Button Size and Placement: Make buttons large enough to be easily tapped with a finger and placed in accessible locations.
- Spacing: Adequate spacing between elements prevents accidental taps and makes the layout easier to scan.
- Navigation: Simplify navigation for mobile users, using a hamburger menu or tabbed navigation. Consider best practices for website navigation to improve user experience.
Elementor’s responsive mode allows you to adjust these elements individually for desktop, tablet, and mobile views, ensuring a consistent and optimized experience across all devices.
Optimizing Images and Videos for Mobile Speed
Large, unoptimized images and videos are a major cause of slow loading times on mobile devices. This can lead to user frustration and high bounce rates. Optimizing these assets is crucial for improving the mobile experience. Consider using tools discussed in this article on Elementor image optimization for best results. Key steps include:
- Compression: Compress images and videos to reduce their file size without sacrificing too much quality. Tools like TinyPNG and HandBrake can be helpful.
- Resizing: Resize images to the maximum dimensions they will be displayed on the screen. There’s no need to serve a 2000px wide image on a mobile device that’s only 400px wide.
- Format: Use modern image formats like WebP, which offer better compression than JPEG or PNG.
- Lazy Loading: Implement lazy loading, which defers the loading of images and videos until they are visible in the viewport.
By optimizing your images and videos, you can significantly improve the loading speed of your sales funnel on mobile devices.
Testing Your Funnel on Different Mobile Devices
While Elementor’s responsive mode provides a good preview of how your funnel will look on different screen sizes, it’s essential to test it on real mobile devices. Different devices have different screen resolutions, operating systems, and browsers, which can affect how your funnel is displayed. Borrow different phones and tablets to get a feel for it. Consider these approaches:
- Real Device Testing: Test your funnel on a variety of mobile devices, including both iOS and Android devices, and different screen sizes.
- Browser Developer Tools: Use the developer tools in your browser to emulate different mobile devices and network conditions.
- User Testing: Ask a few people to test your funnel on their mobile devices and provide feedback.
Pay attention to loading times, layout issues, and any functionality problems. Fix any issues you find to ensure a smooth and seamless mobile experience.
A/B Testing Your Elementor Sales Funnel: Data-Driven Optimization
A/B testing, also known as split testing, is a method of comparing two versions of a webpage or element to see which one performs better. In the context of an Elementor sales funnel, A/B testing is crucial for identifying the most effective design and content choices that drive conversions. It eliminates guesswork and allows you to make data-driven decisions about how to optimize your funnel. Without A/B testing, you are relying on assumptions, which can often be incorrect.
Consider the potential pitfalls of launching a sales funnel without testing. You might be using a headline that doesn’t resonate with your target audience, a call-to-action button that is not prominent enough, or images that don’t effectively convey the value of your product or service. A/B testing allows you to test these elements and identify the best performing variations.
For example, you could test two different headlines for your landing page, one focusing on the benefits of your product and the other focusing on the problem it solves. By running an A/B test, you can determine which headline generates more leads or sales. Remember to document your assumptions before testing and the final outcome to build a knowledge base.
Why A/B Testing is Crucial for Improving Conversion Rates
A/B testing is not just a nice-to-have; it’s a necessity for any business that wants to maximize its conversion rates. Here’s why:
- Data-Driven Decisions: A/B testing provides concrete data on what works and what doesn’t, allowing you to make informed decisions about your design and content.
- Improved User Experience: By testing different variations, you can identify the elements that provide the best user experience, leading to increased engagement and conversions.
- Reduced Risk: A/B testing allows you to test changes on a small portion of your audience before implementing them site-wide, minimizing the risk of negative impacts.
- Continuous Improvement: A/B testing is an ongoing process that allows you to continuously optimize your funnel and improve your results over time.
By embracing A/B testing, you can transform your sales funnel from a static entity into a dynamic, ever-improving conversion machine.
Key Elements to Test in Your Sales Funnel (Headlines, CTAs, Images)
When A/B testing your Elementor sales funnel, there are several key elements you should focus on:
- Headlines: Test different headlines to see which ones grab attention and encourage visitors to continue through the funnel.
- Call-to-Action (CTAs): Experiment with different CTA wording, colors, and placement to see which ones generate the most clicks.
- Images: Test different images to see which ones resonate most with your target audience and effectively convey the value of your product or service.
- Form Fields: Test the number and type of form fields to optimize for lead generation. Fewer fields often lead to higher completion rates, but you need to balance that with the quality of leads.
- Pricing: Test different pricing strategies, such as offering discounts or payment plans, to see which ones drive the most sales.
Remember to test only one element at a time to ensure that you can accurately attribute any changes in performance to the specific element being tested.
Using Elementor’s Built-in Features for A/B Testing
While Elementor doesn’t have built-in A/B testing features directly, you can use its flexibility and integrations to achieve similar results. One approach is to duplicate sections or pages and make changes to one version, then use a plugin like Google Optimize or third-party A/B testing tools that integrate with WordPress. Another effective method involves using Elementor dynamic content to display different variations based on user segments or cookies.
For example, you could create two different versions of your landing page headline and use dynamic content to show each version to a different segment of your audience. You can then track the performance of each version using Google Analytics or another analytics platform. A dedicated A/B testing plugin automates this process and provides more sophisticated reporting.
Analyzing A/B Testing Results and Implementing Changes
Once you’ve run your A/B test for a sufficient period (usually a week or two, depending on traffic volume), it’s time to analyze the results. Look for statistically significant differences in performance between the variations. A statistically significant result means that the difference is unlikely to be due to chance. Most A/B testing tools will provide a p-value, which indicates the probability that the results are due to chance. A p-value of 0.05 or less is generally considered statistically significant.
If you find a winning variation, implement the changes to your live funnel. However, don’t stop there. A/B testing is an ongoing process. Use the insights you gained from your first test to generate new hypotheses and continue testing to further optimize your funnel. Be aware of external factors; make sure external traffic sources remain consistent to avoid skewed results.
Integrating Email Marketing with Your Elementor Sales Funnel
Email marketing remains a powerful tool for nurturing leads and driving conversions. Integrating email marketing with your Elementor sales funnel allows you to capture email addresses, send targeted messages, and automate your follow-up process. This creates a more personalized and engaging experience for your prospects, increasing the likelihood that they will become customers. The key is creating value and building a relationship, not just bombarding people with sales pitches. Also, consider that marketing automation can enhance your outreach.
A common pitfall is treating email marketing as an afterthought. Instead, it should be integrated into your sales funnel from the very beginning. Consider what incentives you can offer to encourage visitors to sign up for your email list, such as a free e-book, a discount code, or access to exclusive content. Also, think about how you can segment your email list to send more targeted and relevant messages to different groups of subscribers.
For example, if you’re selling multiple products, you could segment your email list based on which products people have shown interest in. This allows you to send them targeted emails about those specific products. Make sure to always comply with GDPR and other email marketing regulations. Sending unsolicited emails can damage your reputation and lead to legal consequences.
Collecting Email Addresses on Your Landing and Sales Pages
The first step in integrating email marketing with your Elementor sales funnel is to collect email addresses on your landing and sales pages. Here are some effective strategies:
- Offer a Lead Magnet: Provide a valuable resource in exchange for an email address, such as a free e-book, checklist, or template.
- Use Opt-in Forms: Embed opt-in forms on your landing and sales pages, making it easy for visitors to subscribe to your email list. Elementor’s form widget is an excellent tool for this.
- Use Exit-Intent Popups: Display an exit-intent popup when visitors are about to leave your page, offering them a last-minute opportunity to subscribe.
- Run Contests and Giveaways: Host contests and giveaways that require participants to provide their email addresses.
Make sure your opt-in forms are clear, concise, and visually appealing. Highlight the benefits of subscribing to your email list and assure visitors that you will not spam them.
Creating Automated Email Sequences to Nurture Leads
Once you’ve captured email addresses, it’s time to create automated email sequences to nurture leads and guide them through your sales funnel. These sequences should be designed to provide value, build trust, and ultimately encourage subscribers to make a purchase. A well-crafted sequence can work wonders. Common sequences include:
- Welcome Sequence: A series of emails that are sent immediately after someone subscribes to your email list. These emails should introduce your brand, provide valuable content, and set expectations for future emails.
- Nurturing Sequence: A series of emails that are designed to nurture leads who have shown interest in your product or service but haven’t yet made a purchase. These emails should provide more in-depth information about your product or service, address common objections, and offer testimonials or case studies.
- Sales Sequence: A series of emails that are designed to encourage subscribers to make a purchase. These emails should highlight the benefits of your product or service, offer a special discount or promotion, and provide a clear call to action.
Personalize your email sequences as much as possible, using subscriber names and other data to create a more engaging and relevant experience.
Using Elementor Integrations with Email Marketing Platforms (Mailchimp, ActiveCampaign)
Elementor integrates seamlessly with popular email marketing platforms like Mailchimp and ActiveCampaign, making it easy to connect your sales funnel with your email marketing efforts. These integrations allow you to:
- Automatically add subscribers to your email list when they fill out a form on your Elementor landing page.
- Segment your email list based on user behavior or demographics.
- Send targeted emails based on user actions within your sales funnel.
- Track the performance of your email campaigns directly within Elementor.
By leveraging these integrations, you can streamline your email marketing efforts and create a more effective and personalized experience for your subscribers.
Boosting Sales Funnel Performance with Speed Optimization Best Practices
Website speed is a critical factor in determining the success of your sales funnel. Slow loading times can lead to increased bounce rates, lower conversion rates, and a negative impact on your search engine rankings. In today’s fast-paced digital world, users expect websites to load quickly and efficiently. Ignoring speed optimization can be a costly mistake. Even a one-second delay in page load time can result in a significant decrease in conversions. Studies have shown a direct correlation between website speed and revenue. A faster website provides a better user experience, which leads to increased engagement and sales.
One of the most common pitfalls is neglecting to optimize images. Large, uncompressed images can significantly slow down your website. Another common mistake is not leveraging browser caching, which allows repeat visitors to load your website faster. Minifying CSS and JavaScript files is also essential for reducing file sizes and improving loading times. These simple steps can make a big difference in the overall performance of your sales funnel.
For example, imagine a potential customer lands on your landing page, but it takes more than three seconds to load. Frustrated, they may abandon your website and go to a competitor. By implementing speed optimization best practices, you can prevent this from happening and capture more leads and sales.
Image optimization for faster loading times.
Optimizing images is one of the most effective ways to improve website speed. Here are some key strategies:
- Choose the right file format: Use JPEG for photos, PNG for graphics with transparency, and WebP for modern browsers. WebP offers superior compression and quality compared to JPEG and PNG.
- Compress images: Use image compression tools like TinyPNG or ImageOptim to reduce file sizes without sacrificing too much quality.
- Resize images: Resize images to the maximum dimensions they will be displayed on your website. There’s no need to upload a 2000px wide image if it will only be displayed at 500px wide.
- Use lazy loading: Implement lazy loading to defer the loading of images until they are visible in the viewport. This can significantly improve initial page load time.
By following these best practices, you can dramatically reduce image file sizes and improve your website’s loading speed.
Leverage browser caching to improve website speed.
Browser caching allows visitors’ browsers to store static assets, such as images, CSS files, and JavaScript files, on their local devices. This means that when they revisit your website, their browser can load these assets from the cache instead of downloading them from your server, resulting in faster loading times. Here’s how to leverage browser caching:
- Set proper cache headers: Configure your server to send proper cache headers, which tell browsers how long to cache your website’s assets.
- Use a caching plugin: Install a caching plugin like WP Rocket or LiteSpeed Cache to automate the process of setting cache headers and optimizing your website’s cache settings.
- Use a Content Delivery Network (CDN): A CDN stores your website’s assets on servers around the world, allowing visitors to download them from the server that is closest to them. This can significantly improve loading times for visitors who are located far away from your server.
By leveraging browser caching, you can significantly improve the loading speed of your website for repeat visitors.
Minifying CSS and JavaScript to reduce file sizes.
Minifying CSS and JavaScript files involves removing unnecessary characters, such as whitespace and comments, from your code. This reduces the file size and improves loading times. Here’s how to minify CSS and JavaScript files:
- Use a minification tool: Use a minification tool like UglifyJS or CSSNano to automatically minify your CSS and JavaScript files.
- Use a plugin: Install a plugin like Autoptimize or WP Rocket to automatically minify your CSS and JavaScript files and integrate the process into your WordPress workflow.
Remember to back up your files before minifying them, as the process can sometimes introduce errors. By minifying your CSS and JavaScript files, you can further reduce file sizes and improve your website’s loading speed. It’s also important to ensure your site meets website accessibility standards, as outlined in this guide: Elementor: Website Accessibility Checklist for Developers.
Tracking Your Elementor Sales Funnel’s Performance with Google Analytics
Setting Up Conversion Tracking in Google Analytics
Before you can analyze your sales funnel, you need to set up conversion tracking in Google Analytics. This involves defining your funnel’s key milestones as goals. For an e-commerce site using Elementor, this might include events like “Product Page View,” “Add to Cart,” “Checkout Started,” and “Purchase Completed.” In Google Analytics 4 (GA4), you can configure these events as conversions, marking them as important actions you want to track. Make sure to properly configure cross-domain tracking if your funnel spans multiple domains, for example, if your payment processor is on a separate domain. A critical decision point here is choosing whether to use regular expressions for URL matching in your goal setup, which provides flexibility but also increases the risk of misconfiguration. Double-check your event parameters and naming conventions to ensure data accuracy.
Monitoring Key Metrics: Traffic, Conversion Rate, Bounce Rate
Once conversion tracking is set up, regularly monitor key metrics to understand your funnel’s health. Traffic volume shows how many people are entering your funnel at each stage. Conversion rate reveals the percentage of users progressing from one step to the next (e.g., from product page to “Add to Cart”). Bounce rate indicates the percentage of users who leave your site after viewing only one page – a high bounce rate on a landing page might signal issues with relevance or user experience. Analyze these metrics segmenting by traffic source (organic search, paid ads, social media) to identify which channels are driving the most engaged users. Pay attention to page load times as slow loading speed can significantly increase bounce rates and decrease conversions. Tools like Google PageSpeed Insights can help identify and address performance bottlenecks.
Identifying Areas for Improvement Based on Analytics Data
The insights from Google Analytics will pinpoint areas for optimization. For instance, a significant drop-off between the “Add to Cart” and “Checkout Started” steps suggests a problem with your shopping cart design or process. This could involve unclear instructions, excessive form fields, or lack of trust signals like security badges. If you notice a high bounce rate on a specific landing page, A/B test different headlines, images, or calls-to-action to improve engagement. Look for patterns in user behavior using tools like heatmaps and session recordings to understand how visitors interact with your Elementor pages and identify friction points. Consider implementing personalized content and offers based on user behavior to improve conversion rates, as demonstrated by the advanced uses of Elementor Dynamic Content.
The Elementor Add-ons That Will Supercharge Your Funnel Building
Highlighting CopyElement components and templates
CopyElement is designed to significantly accelerate your Elementor funnel-building process. With over 4000 pre-designed UI components and templates, you can quickly assemble high-converting landing pages, checkout forms, and other essential funnel elements. For example, you can use CopyElement’s pre-built pricing table sections to showcase your product offerings with clear value propositions. Select from various call-to-action button styles to drive conversions. The advantage is a consistent design language and mobile responsiveness baked into each component. When choosing a component library, consider whether it offers regular updates with new designs, the level of customization available, and the quality of support provided. Be careful not to over-rely on pre-built templates without tailoring them to your specific brand and audience, potentially sacrificing uniqueness and relevance.
Other essential plugin recommendations to improve website efficiency
Besides CopyElement, consider plugins that enhance Elementor’s core functionality and streamline your workflow. For form building, plugins like WPForms or Gravity Forms offer advanced features like conditional logic and integration with marketing automation platforms. To optimize website speed and performance, consider using plugins like WP Rocket or Perfmatters for caching, image optimization, and code minification. As an additional point, optimizing your images with tools and plugins helps with performance, and you can review our guide to Elementor Image Optimization to better understand how to implement these tactics. For A/B testing, OptinMonster or Convert Pro can help you test different variations of your funnel pages and optimize for conversions. When selecting plugins, prioritize those with positive reviews, frequent updates, and compatibility with your existing theme and plugins. Regularly audit your plugins and remove any that are unnecessary or outdated, as they can negatively impact performance and security.
Common Mistakes to Avoid When Building Elementor Sales Funnels
Ignoring Mobile Optimization
In 2026, mobile traffic dominates web usage, making mobile optimization non-negotiable. Ignoring mobile responsiveness in your Elementor sales funnel can lead to a disastrous user experience and lost conversions. Use Elementor’s responsive editing mode to ensure your pages look and function flawlessly on all devices. Pay attention to font sizes, button sizes, and image sizes, adjusting them for smaller screens. Test your funnel on different mobile devices and browsers to identify any compatibility issues. Use a mobile-first indexing approach, where the mobile version of your website is prioritized for search engine ranking. Neglecting Elementor website accessibility for mobile users, such as providing sufficient contrast and alternative text for images, can further alienate potential customers.
Using Confusing or Unclear Messaging
Your sales funnel’s messaging should be clear, concise, and persuasive at every stage. Confusing or unclear messaging can lead to user frustration and abandonment. Use strong headlines that grab attention and clearly communicate the value proposition. Write compelling copy that addresses your target audience’s needs and pain points. Use clear calls-to-action that guide users through the funnel. Avoid jargon or technical terms that may confuse your audience. Get feedback from others on your messaging to ensure it is easily understood. Regularly review and refine your messaging based on user feedback and analytics data. For example, a value proposition like “Get 50% off” is often clearer than a vague statement such as “Incredible savings.”
Failing to Track and Analyze Performance
Building a sales funnel without tracking and analyzing its performance is like flying blind. Without data, you have no way of knowing what’s working and what’s not. Implement conversion tracking in Google Analytics to monitor key metrics like traffic, conversion rate, and bounce rate. Use heatmaps and session recordings to understand how users interact with your funnel pages. Conduct A/B tests to optimize different elements of your funnel. Regularly review your analytics data and identify areas for improvement. Don’t just collect data – take action based on the insights you gain. For example, if you notice a high drop-off rate on your checkout page, investigate the reasons why and make changes to address the issue.
Advanced Tips for Maximizing ROI with Your Elementor Sales Funnel in 2026
Personalizing the User Experience Based on Behavior
Personalization is key to maximizing ROI in 2026. Use Elementor’s dynamic content features to tailor the user experience based on their behavior and preferences. Show different content to first-time visitors versus returning customers. Offer personalized product recommendations based on their browsing history. Segment your audience based on demographics, interests, and purchase history, and create targeted landing pages and offers for each segment. For example, if a user has previously viewed a specific product category, show them related products on your landing page. Personalize email follow-ups with targeted messaging based on their actions within the funnel. The closer you align the experience to individual user needs, the higher your conversion rates will be. Consider the principles of UI/UX design to improve the overall experience.
Implementing Retargeting Campaigns to Reach Lost Visitors
Retargeting is a powerful way to re-engage visitors who left your sales funnel without converting. Use platforms like Google Ads and Facebook Ads to show targeted ads to users who visited specific pages on your website. For example, you can retarget users who added products to their cart but didn’t complete the purchase with ads highlighting those products and offering a discount. Create different retargeting campaigns for different segments of your audience based on their behavior. Use compelling ad creatives and messaging that speaks directly to their needs and pain points. Set a frequency cap to avoid overwhelming users with too many ads. Track the performance of your retargeting campaigns and optimize them for maximum ROI. It is also worth noting that you should take steps to ensure Elementor website security for these users.
Using AI-Powered Tools to Optimize Your Funnel
AI-powered tools are revolutionizing sales funnel optimization. Leverage AI for tasks like content creation, A/B testing, and personalization. Use AI-powered copywriting tools to generate high-converting headlines and ad copy. Employ AI-driven A/B testing platforms to automatically test different variations of your funnel pages and identify the best-performing combinations. Utilize AI-powered personalization engines to deliver dynamic content and offers tailored to individual user preferences. An example is using an AI powered content creation tool to create personalized welcome messages based on the traffic source. Be mindful of data privacy and ethical considerations when using AI, and ensure transparency with your users. Continuously monitor and evaluate the performance of your AI-powered tools to ensure they are delivering the desired results. AI-powered SEO is also an important consideration.
By strategically tracking performance, leveraging Elementor’s capabilities and add-ons, avoiding common pitfalls, and embracing advanced optimization techniques like personalization and AI, you can build highly effective Elementor sales funnels that deliver significant ROI in 2026 and beyond.