
This guide dives deep into how to ensure your Elementor-built websites are not just visually appealing but also incredibly fast. We’ll explore the reasons behind performance issues, how to diagnose them, and the actionable steps you can take to achieve lightning-fast load times.
Unlock Lightning-Fast Load Times: Why Elementor Performance Matters in 2026
Website speed has evolved from a nice-to-have feature to a critical component of online success. In 2026, users are more impatient than ever. Studies consistently show that a delay of just a few seconds can lead to a significant increase in bounce rates and a decrease in conversions. For businesses relying on their website for leads, sales, or brand engagement, a slow site directly impacts their bottom line. This is especially true for visually rich sites often built with tools like Elementor, where the temptation to add numerous elements can inadvertently slow things down.
Elementor, while a powerful and flexible page builder, can sometimes contribute to performance issues if not managed carefully. Its drag-and-drop interface and extensive widget library offer immense creative freedom. However, this power comes with a responsibility to optimize. The ease with which complex layouts can be created means it’s also easy to unintentionally add excessive code, large assets, or inefficient structures that can hinder load times. Understanding this balance between functionality and performance is key to leveraging Elementor effectively for speed.
The Evolution of User Expectations: Speed is No Longer Optional
The digital world has conditioned users to expect immediate gratification. Milliseconds matter. A study by Google found that for every second of delay in mobile page load time, the probability of a bounce increases by 105%. This trend has only intensified in recent years. Users simply don’t have the patience to wait for slow-loading pages, especially on mobile devices where bandwidth can be more variable. This expectation forces website owners to prioritize speed, making it a non-negotiable aspect of web design. If your website feels sluggish, visitors will quickly move on to a competitor’s site that offers a better, faster experience. Prioritizing user experience through speed is therefore a fundamental business strategy in 2026.
Elementor’s Role in Website Speed: Power vs. Potential Bloat
Elementor’s strength lies in its extensive features and ease of use, enabling rapid website development. However, this versatility can sometimes lead to performance bloat. Each widget, effect, or addon you incorporate adds code and resources to your page. If not managed properly, the accumulation of these elements can significantly increase the page’s weight and complexity. For instance, using numerous animations, parallax scrolling effects, or extensive custom CSS can strain browser rendering. The key is to utilize Elementor’s capabilities judiciously, understanding that every added feature has a potential performance cost. It’s a balancing act between maximizing design potential and maintaining a lean, efficient codebase. Learning to identify and disable unnecessary features is crucial for keeping your Elementor site fast.
The SEO Impact of a Slow Elementor Site: Ranking Penalties and User Bounce Rates
Search engines like Google explicitly consider page speed as a ranking factor. A slow website not only frustrates users but also signals to search engines that your site may not provide the best experience. This can lead to lower search engine rankings, making it harder for potential visitors to find you. Furthermore, high bounce rates, often a direct consequence of slow loading times, tell search algorithms that visitors are not finding value on your page. This negative feedback loop can severely impact your SEO performance. Even if your content is excellent, a slow site can prevent it from being discovered. Investing in Elementor performance optimization is, therefore, a direct investment in your website’s visibility and organic traffic. You can explore strategies to improve your site’s user experience, which can indirectly aid SEO, by focusing on effective Elementor UX design principles.
Auditing Your Elementor Site’s Current Speed Performance
Before you can optimize, you need to understand where you stand. Auditing your Elementor website’s current speed performance is the essential first step. This process involves using specialized tools to measure various aspects of your site’s loading speed and identify specific areas of weakness. Without this foundational analysis, your optimization efforts might be misdirected, addressing symptoms rather than root causes. A comprehensive audit will provide a clear picture of how quickly your pages load, how much data is being transferred, and what elements are contributing most to delays. This data-driven approach ensures that your subsequent optimization steps are focused and effective, leading to measurable improvements.
The goal of an audit is to move beyond guesswork and pinpoint the exact bottlenecks hindering your site’s performance. This might involve examining server response times, the efficiency of your code, the size and number of assets (images, scripts, stylesheets), and how well your website performs under different network conditions. By systematically testing and analyzing, you gain actionable insights that form the basis of a robust performance optimization strategy. This initial assessment sets the stage for targeted improvements that yield the most significant gains.
Essential Tools for Speed Testing: GTmetrix, PageSpeed Insights, and More
To effectively audit your Elementor site’s speed, you’ll need to leverage a suite of reliable testing tools. GTmetrix is a popular choice, offering detailed reports on performance scores, load times, page size, and request counts. It provides waterfall charts that visually represent the loading sequence of your page’s assets, making it easy to spot slow-loading elements. Another crucial tool is Google PageSpeed Insights, which analyzes your page’s performance on both mobile and desktop and provides actionable recommendations aligned with Core Web Vitals. WebPageTest offers even more advanced testing, allowing you to simulate loading from various locations and on different browser types. These tools provide objective data, helping you understand exactly what needs fixing. For example, if GTmetrix shows a high number of requests or a large page size originating from Elementor’s assets, you know where to start your optimization efforts.
Decoding the Metrics: Understanding Core Web Vitals in Elementor
When analyzing your Elementor site’s speed, understanding the key performance metrics is vital. Core Web Vitals, a set of metrics defined by Google, are particularly important for SEO and user experience. These include Largest Contentful Paint (LCP), which measures loading performance; First Input Delay (FID), which measures interactivity; and Cumulative Layout Shift (CLS), which measures visual stability. For an Elementor site, poor LCP might be caused by large hero images or render-blocking JavaScript. High FID could stem from complex JavaScript interactions generated by Elementor widgets. Significant CLS might be due to images or ads loading after the initial content, causing layout shifts. By focusing on improving these specific metrics, you can ensure your Elementor site provides a smooth and responsive experience for all users. Addressing these can also be linked to improving the efficiency of pre-built components you might be using, ensuring they load quickly, similar to how Elementor components can speed up design.
Identifying Specific Bottlenecks in Your Elementor Setup
Once you’ve run your speed tests, the next step is to dissect the results and pinpoint the exact bottlenecks within your Elementor setup. Common culprits include excessive use of widgets, particularly those with complex functionalities like sliders, accordions, or animations. Each widget often loads its own CSS and JavaScript files, which can add up quickly. Another frequent issue is the inclusion of unoptimized images, which are often the largest contributors to page weight. Look for large file sizes, incorrect dimensions, or inefficient formats. Additionally, custom CSS and JavaScript added within Elementor can become performance drains if not written efficiently or if they load unnecessarily. Analyze the waterfall charts from GTmetrix or WebPageTest to identify individual assets or scripts that are taking an unusually long time to load. For instance, if you notice a specific Elementor widget’s associated script file taking 3 seconds to load, that’s a clear bottleneck to investigate.
Optimizing Elementor’s Core Settings for Maximum Efficiency
Elementor itself offers several built-in features and configurations that, when properly managed, can significantly boost your website’s performance. It’s not just about external optimizations; understanding and utilizing Elementor’s internal capabilities is equally crucial. This section focuses on leveraging these core settings to create a more efficient page-building workflow that inherently leads to faster loading times. By fine-tuning how Elementor handles your content and assets, you can lay a strong foundation for a speed-optimized website.
The aim here is to make Elementor work smarter, not harder. This involves a combination of enabling performance-enhancing features provided by Elementor (especially in the Pro version) and proactively disabling elements that are not contributing to your site’s functionality or user experience. A well-configured Elementor installation will load only what’s necessary for each page, reducing unnecessary code and resource overhead. This proactive approach ensures that even complex designs remain performant.
Leveraging Elementor’s Built-in Performance Features (Pro Recommended)
Elementor Pro offers a suite of powerful features specifically designed to enhance website performance. One of the most impactful is the CSS print method optimization. By default, Elementor might generate separate CSS files for each widget. Elementor Pro allows you to combine these into a single CSS file, reducing HTTP requests. Furthermore, it offers a “Render Blocking CSS” option, which optimizes how CSS is loaded to prevent it from delaying the rendering of your page’s content. Another valuable feature is the ability to disable unused assets more effectively. While we’ll discuss disabling unused widgets separately, Pro version’s asset management capabilities are more robust. For users building with CopyElement’s pre-designed sections and templates, ensuring Elementor’s performance settings are optimized is key to realizing the full speed benefits, as indicated by guides on building faster WordPress websites with components.
Disabling Unused Widgets and Features: A Quick Win
A significant performance boost can be achieved by simply disabling widgets and features within Elementor that you don’t actively use. Elementor comes with a vast library of widgets, and even if you don’t use them on a specific page, their associated CSS and JavaScript files might still be loaded on the frontend, adding unnecessary bloat. To combat this, navigate to Elementor > Settings > General in your WordPress dashboard. Here, you’ll find toggles for various widgets. Go through this list and disable any widgets you and your team don’t plan on using across your entire website. For example, if you never use the countdown widget, turn it off. This simple act of decluttering reduces the amount of code Elementor needs to load, leading to faster page rendering. It’s a foundational step that requires minimal effort but delivers tangible results, similar to how using pre-built templates can streamline your workflow.
Controlling Asset Loading: CSS and JavaScript Optimization Strategies
Managing how CSS and JavaScript files are loaded is critical for Elementor performance. Many Elementor widgets enqueue their own scripts and styles, which can lead to an explosion of HTTP requests and large file sizes. A key strategy is asset optimization. This often involves using a caching plugin that can minify and combine CSS and JavaScript files. Minification removes unnecessary characters from code, reducing file size, while combining merges multiple files into one, reducing the number of requests the browser needs to make. Furthermore, consider implementing conditional loading. Some plugins allow you to specify that certain scripts or styles should only load on pages where they are actually used. For example, a complex animation script might only be needed on a single landing page, not your entire site. This targeted approach significantly reduces the load on pages where these assets aren’t present, contributing to faster load times and a more efficient experience, especially when working with advanced layouts that benefit from techniques in crafting Elementor landing pages that convert.
Image Optimization: The Silent Killer of Elementor Load Times
Images are often the most significant contributors to a webpage’s overall file size. For Elementor websites, which can be visually rich and image-heavy, unoptimized images can be the primary culprit behind slow load times. They consume bandwidth, increase server load, and directly impact the user’s perception of speed. Neglecting image optimization is akin to building a fast car with heavy, drag-inducing tires – it will never reach its full potential.
The good news is that image optimization is highly achievable. By employing the right techniques and tools, you can drastically reduce image file sizes without sacrificing visual quality. This involves selecting appropriate file formats, compressing images effectively, and ensuring they are delivered in the correct dimensions. Addressing image optimization comprehensively is one of the most impactful steps you can take to accelerate your Elementor-powered website.
Choosing the Right Image Formats: WebP and Beyond
Selecting the appropriate image format is a fundamental step in optimizing images for web performance, especially within an Elementor context. For modern web development in 2026, the WebP format stands out as a superior choice for most use cases. Developed by Google, WebP offers significantly better compression than older formats like JPEG and PNG, resulting in smaller file sizes while maintaining comparable visual quality. This means faster loading times for your Elementor pages. WebP supports both lossy and lossless compression, as well as transparency and animation. When WebP isn’t supported by a user’s browser, it’s essential to have a fallback mechanism, typically JPEG or PNG, to ensure compatibility. Tools and plugins can automate this process, serving WebP to compatible browsers and a fallback to others. Properly implementing WebP can dramatically reduce the impact of images on your site’s speed metrics.
Compression Techniques: Lossless vs. Lossy for Elementor Assets
Image compression is a critical technique for reducing file sizes, and understanding the difference between lossless and lossy compression is key for Elementor assets. Lossless compression reduces file size without any loss of image quality. It works by removing redundant metadata and optimizing the image data itself. This is ideal for images where absolute clarity is paramount, such as logos or graphics with sharp lines. However, the file size reduction is typically less dramatic than with lossy compression. Lossy compression, on the other hand, achieves much smaller file sizes by selectively discarding some image data that is often imperceptible to the human eye. This method is highly effective for photographs and complex images used in Elementor designs. For example, a photograph on a blog post or landing page can often be compressed using lossy methods without a noticeable degradation in quality. The challenge is finding the right balance – compressing enough to significantly reduce file size while preserving visual fidelity. Many image optimization plugins for WordPress offer both options, allowing you to choose the best approach for each image type used within your Elementor layouts.

Lazy Loading Images in Elementor: Implementing the Delay
Lazy loading is a powerful technique that defers the loading of images until they are actually needed by the user – specifically, when they scroll down the page and the image enters the viewport. This is an extremely effective method for improving initial page load times on Elementor sites, especially those with numerous images or long scrollable pages. Instead of downloading all images at once, the browser only loads the images visible in the initial view. As the user scrolls, additional images are then loaded on demand. Most modern WordPress themes and caching plugins, including those compatible with Elementor, offer built-in lazy loading options. You can often enable it directly in your WordPress media settings or within your chosen optimization plugin. For Elementor specifically, ensure your theme or plugin’s lazy loading functionality works seamlessly with its widget structure. This delay dramatically reduces the initial payload, making your Elementor pages feel significantly faster upon first load.
Resizing and Serving Correctly Sized Images for Different Devices
Serving images that are the correct size for the device they are being viewed on is paramount for Elementor performance. Uploading a massive, high-resolution image and letting CSS resize it on the frontend is highly inefficient. The browser still has to download the entire large file, even if it’s only displayed as a small thumbnail. The solution is to implement responsive images. This involves creating multiple versions of an image at different resolutions and using HTML’s `srcset` attribute to tell the browser which version is most appropriate for the current screen size and resolution. For Elementor users, this can often be handled by your theme, an optimization plugin, or even Elementor’s own image widget features that support responsive settings. For example, if you have a large banner image that displays full-width on a desktop but shrinks to a smaller size on a tablet, you should ideally have separate, smaller image files optimized for tablet and mobile views. This ensures users on smaller devices aren’t unnecessarily downloading large files, directly contributing to faster mobile load times and a better user experience across all devices. This is also critical for optimizing images within various Elementor templates for agency workflows.
Caching Strategies for Speedy Elementor Websites
Caching is a cornerstone of website performance optimization, and for Elementor-built sites, it’s particularly crucial. Effective caching can dramatically reduce the time it takes for your pages to load, leading to a better user experience and improved search engine rankings. At its core, caching involves storing copies of your website’s files and data so they can be served more quickly on subsequent visits. Without proper caching, every visitor would trigger a fresh generation of your Elementor pages, placing an unnecessary burden on your server and slowing down delivery. Understanding the different types of caching available and how to implement them is key to unlocking your Elementor website’s full speed potential. This involves making informed decisions about what to cache, where to cache it, and for how long, ensuring that users receive the fastest possible experience.
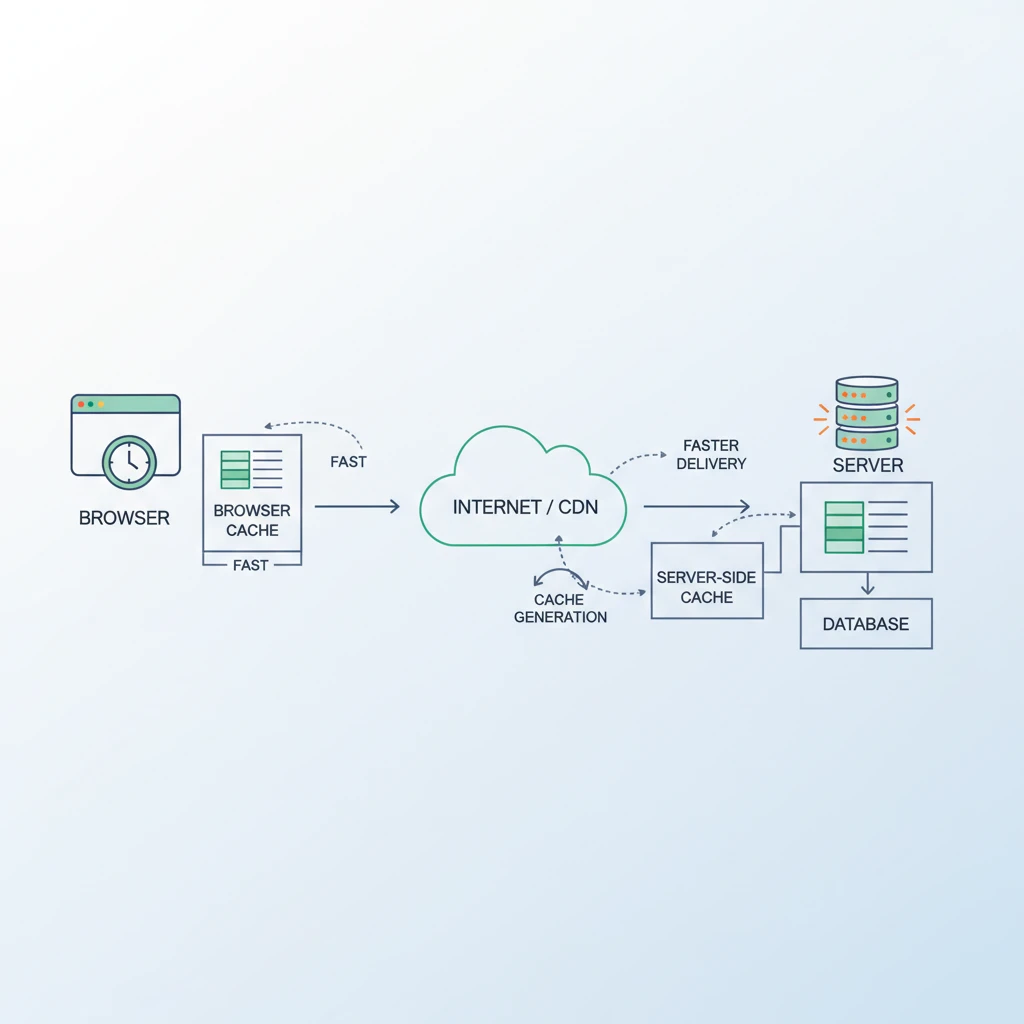
Understanding Browser Caching and Server-Side Caching
Two primary forms of caching significantly impact website speed: browser caching and server-side caching. Browser caching instructs a user’s web browser to store local copies of your website’s static assets, such as CSS files, JavaScript, images, and even HTML. When a visitor returns to your site, their browser can load these resources directly from their local storage rather than re-downloading them from your server. This dramatically speeds up repeat visits. The decision criteria for what should be cached involve identifying assets that change infrequently. HTML files, for instance, might have shorter cache durations than static images or CSS stylesheets. A common pitfall is setting cache expiration times too long for frequently updated content, which can lead to users seeing outdated versions of your site.
Server-side caching, on the other hand, operates on your web server. It pre-generates static HTML versions of your dynamic Elementor pages. When a visitor requests a page, the server can deliver this pre-built HTML file directly, bypassing the need for Elementor to rebuild the page on the fly each time. This significantly reduces server processing time and database queries. Popular server-side caching methods include page caching (storing the entire rendered page) and object caching (storing results of database queries). A key decision point here is balancing the speed gain with cache invalidation: ensuring that when content is updated, the cache is cleared or refreshed appropriately to show the latest version. For instance, after publishing a new blog post, the cache needs to be updated to include the new content.
Recommended Caching Plugins for WordPress and Elementor
For WordPress users, leveraging specialized caching plugins is the most accessible and effective way to implement robust caching strategies. These plugins automate much of the complex configuration, offering user-friendly interfaces to manage your website’s cache. When choosing a plugin, consider its compatibility with Elementor, its performance track record, and the breadth of its features. Some top-tier options include WP Rocket, known for its all-in-one approach to performance optimization including caching, file optimization, and lazy loading. Another excellent choice is W3 Total Cache, which offers a more granular control over various caching types (page, object, browser, CDN) but requires more technical expertise. For simpler needs, LiteSpeed Cache can be highly effective if your hosting server runs on LiteSpeed technology, often providing superior performance benefits.
When evaluating plugins, look for features like automatic cache clearing upon content updates, mobile-specific caching options, and integration with Content Delivery Networks (CDNs). A critical pitfall to avoid is installing multiple caching plugins simultaneously, as this can lead to conflicts and broken website functionality. Always research a plugin’s reviews and support resources before installing. For example, a plugin that effectively caches static assets but struggles to invalidate the cache for dynamic Elementor content could lead to users seeing stale page elements, negating the benefits of caching. Testing your site thoroughly after activating any caching plugin is paramount.
Configuring Cache Settings for Optimal Elementor Content Delivery
Proper configuration of your chosen caching plugin is vital for delivering Elementor content efficiently. Most plugins offer distinct settings for page caching, browser caching, and sometimes object caching. For page caching, ensure that the plugin is set to cache your Elementor-created pages. You’ll typically find options to exclude certain URLs or post types from caching. A common decision point is whether to cache pages for logged-in users. While caching for anonymous visitors is almost always beneficial, caching for logged-in users can sometimes cause issues if the content dynamically changes based on user roles or preferences. It’s generally safer to disable caching for logged-in users unless you have a specific reason and have tested it thoroughly.
For browser caching, you’ll configure expiration times for different file types (CSS, JavaScript, images). A good starting point is to set long expiration times for static assets like images and CSS files that don’t change often, perhaps 30 days or more. JavaScript files might require slightly shorter durations. A crucial pitfall to avoid is setting these expiration times too short, which defeats the purpose of browser caching. Conversely, setting them too long for frequently updated assets can lead to users seeing outdated versions. For Elementor-specific content, consider if any of your designs rely on highly dynamic elements that might break with aggressive caching. Always leverage your plugin’s cache clearing functionality after making changes to your Elementor designs or content.
Minification and Concatenation: Streamlining Your Code
Minification and concatenation are essential techniques for optimizing the loading speed of your Elementor websites by reducing the size and number of your website’s code files. As websites become more complex, they often accumulate numerous CSS and JavaScript files. Each of these files requires a separate HTTP request from the browser to the server, which adds latency. By intelligently processing these files, you can significantly speed up your site’s performance, leading to a smoother user experience and better engagement metrics. This process is particularly relevant for Elementor sites, which rely heavily on JavaScript for its interactive features and CSS for its sophisticated styling capabilities. Streamlining these assets ensures that Elementor’s functionality can be delivered to the user as quickly as possible.
The Role of Minifying CSS and JavaScript Files
Minification is the process of removing all unnecessary characters from your CSS and JavaScript files without altering their functionality. This includes removing whitespace, comments, line breaks, and even shortening variable names. The primary goal is to reduce the file size of these assets. For Elementor, which often generates a considerable amount of CSS and JavaScript, minification can yield substantial performance gains. A smaller file size means quicker downloads, directly translating to faster page load times. For example, a 10KB JavaScript file that is minified down to 6KB represents a 40% reduction, which can be compounded across multiple scripts on a page.
When minifying, the key decision criterion is to ensure that the process doesn’t break your website’s functionality or styling. Most modern optimization plugins handle this intelligently, preserving essential code structures. A common pitfall is minifying files that are already minified or using multiple tools that interfere with each other, leading to errors. Another consideration is the impact on debugging. Minified code is less human-readable, so it’s often recommended to disable minification during the development phase and re-enable it for the live site. For Elementor users, ensuring that the plugin correctly minifies Elementor’s own generated CSS and JavaScript is crucial.
Combining Files to Reduce HTTP Requests in Elementor
Concatenation, also known as file combination, involves merging multiple CSS or JavaScript files into a single file. Each file your website loads requires a separate HTTP request. By reducing the number of requests, you decrease the overhead associated with establishing these connections, which is especially beneficial on slower networks or for users with many tabs open. For instance, if your Elementor site loads five separate CSS files, concatenating them into one single file reduces five requests down to just one. This is a significant win for page load speed.
The decision criteria for concatenation involve balancing the reduction in HTTP requests against the potential for creating overly large individual files. If you have many small files, combining them is usually beneficial. However, if the resulting single file becomes excessively large, it might take longer to download than the sum of the individual files, especially with HTTP/2, which handles multiple requests more efficiently. A pitfall to watch out for is when combining files leads to conflicts between styles or scripts that were intended to load independently. Always test your site’s appearance and functionality thoroughly after enabling concatenation. For Elementor, ensure that the plugin is configured to correctly combine the core Elementor scripts and styles along with any third-party addon scripts.
Potential Pitfalls of Concatenation: Testing Thoroughly
While concatenation offers substantial benefits in reducing HTTP requests, it’s not without its potential drawbacks, and thorough testing is non-negotiable. One of the primary pitfalls is the risk of creating file conflicts. If two different scripts or stylesheets rely on specific loading orders or variables that clash when combined, it can lead to unexpected behavior, broken layouts, or features failing to work. For example, if one script defines a variable named `config` and another script also defines `config` with a different value, combining them could cause one of the scripts to malfunction.
Another pitfall relates to caching. If a single concatenated file contains both frequently updated content and rarely updated content, updating just one small part of it will necessitate re-downloading the entire large file for users, even if most of it hasn’t changed. This is why careful consideration of file dependencies and update frequency is important. Decision criteria should include assessing the size of the resulting concatenated files. If a combined file exceeds 150-200KB, it might be more beneficial to serve it in smaller chunks or reconsider the concatenation strategy, especially if your site uses HTTP/1.1. For Elementor sites, particularly those using multiple addons, the complexity of combining all scripts and styles can increase the likelihood of issues. Always test your website extensively across different browsers and devices after enabling concatenation to ensure everything functions as expected.
Choosing Lightweight Elementor Templates and Components
The foundation of a fast Elementor website lies in the selection of its building blocks. This means prioritizing lightweight templates and components that are designed with performance in mind. While Elementor offers immense design flexibility, the choices you make regarding pre-designed templates and third-party addons can have a significant impact on your site’s load times. Opting for lean, efficient designs and avoiding feature-bloated elements will contribute more to a speedy website than any post-optimization technique alone. It’s about building a strong, performant base from the start.
Prioritizing Performance-Optimized Templates from CopyElement
When selecting Elementor templates, especially from a resource like CopyElement, a key decision criterion should be their emphasis on performance. Not all templates are created equal. Some designers might prioritize extensive features and complex visual effects over lean code and optimized asset loading. At CopyElement, we understand that speed is paramount. Therefore, we strive to offer templates and components that are not only visually appealing and conversion-focused but also built with efficient coding practices. Look for templates that utilize fewer custom scripts, optimize image usage, and avoid unnecessary code bloat.
When browsing, consider the complexity of the design. A template with a simpler, cleaner layout often translates to better performance. A pitfall to avoid is downloading templates that are packed with features you don’t intend to use. For example, a template designed for a portfolio might include intricate hover effects or animations that are irrelevant to a service-based business website. By choosing performance-optimized templates from sources that explicitly state their focus on speed, such as many of the offerings at CopyElement, you lay a solid groundwork for a faster website. Exploring Elementor: Speedy Site Design with Ready Components can provide further insights into choosing efficient building blocks.
Evaluating Elementor Addons: Do They Impact Speed?
Elementor addons can extend the builder’s functionality, offering a vast array of new widgets and features. However, it’s critical to understand that each addon you install adds code to your website, which can potentially impact loading times. The impact varies significantly based on the addon’s quality, the number of features it introduces, and how well its code is optimized. Poorly coded addons can introduce unnecessary JavaScript, bloated CSS, and inefficient requests, slowing down your Elementor pages considerably.
When evaluating an addon, consider its necessity. Do you genuinely need the functionality it provides, or can Elementor’s core widgets or other lean addons achieve the same result? A decision criterion should be the addon’s reputation for performance. Look for reviews or developer statements that address speed optimization. A pitfall is installing a multitude of addons “just in case” you might need them. This can lead to a bloated website even if you only use a few widgets from each. If an addon adds extensive functionality you don’t use, it’s best to avoid it. For instance, an addon that provides 50 new widgets but you only use two might be significantly slowing down your site compared to a specialized addon that offers just one or two highly optimized widgets you need.
The Impact of Complex Animations and Interactions on Load Times
Elementor excels at enabling visually rich websites with animations and interactive elements, which can significantly enhance user engagement. However, complex animations and intricate interactions come at a performance cost. Heavy use of JavaScript-driven animations, parallax scrolling effects, elaborate transitions, and interactive elements can increase page load times by demanding more processing power from the user’s device and requiring larger file downloads. For example, a full-page parallax effect that loads multiple high-resolution images and performs complex calculations can significantly delay the time to interactive (TTI).
The decision criteria for using animations should always involve a trade-off analysis between aesthetic appeal and performance. Ask yourself if an animation truly adds value to the user experience or if it’s merely decorative. A pitfall is to go overboard, adding animations to every possible element without considering their collective impact. For instance, having a fade-in animation on every single section and widget, along with a subtle hover effect on all interactive elements, can cumulatively slow down your page. When implementing animations, prioritize native CSS animations where possible, as they are generally more performant than JavaScript-based alternatives. For Elementor users looking to add dynamic flair, it’s wise to explore Elementor: Elevate UX with Interactive Website Elements while keeping performance best practices in mind.
Database Optimization: Keeping Your WordPress Backend Lean
While frontend optimization techniques like caching and code minification are crucial, the health of your WordPress database plays an equally significant role in overall website speed, especially for Elementor-powered sites. A bloated or inefficient database can slow down everything from content retrieval to Elementor’s editor loading times. WordPress databases store all your content, settings, and user data. Over time, this database can accumulate unnecessary data, such as old post revisions, spam comments, and transient options, which can degrade performance.
Regularly Cleaning Up Post Revisions and Transient Data
Post revisions are saved automatically by WordPress every time you edit a post or page. While useful for tracking changes and reverting to previous versions, an excessive number of revisions can bloat your database. Decision criteria for managing revisions include setting a reasonable limit for how many revisions are stored per post, or periodically deleting older ones. Many themes and plugins store temporary data called transients, which are often used to cache information. If these transients don’t expire properly, they can accumulate and consume significant database space. For example, a transient set to expire in 24 hours but never cleared could remain in the database indefinitely.
A pitfall to avoid is completely disabling post revisions without understanding the implications, as this removes your ability to revert to earlier drafts. Instead, limiting the number of revisions stored is a more balanced approach. Similarly, some plugins or themes might not have proper cleanup routines for transients. Regularly checking your database for these accumulated items and removing them is a vital step in maintaining performance. For instance, you might find hundreds or thousands of expired transients cluttering your database, which, when cleared, can immediately improve query speeds.
Optimizing Your WordPress Database with Plugins
Fortunately, managing and optimizing your WordPress database can be significantly simplified with the use of specialized plugins. These tools automate the cleanup process, making it accessible even for users without deep technical knowledge. When choosing a database optimization plugin, consider its reliability, the breadth of its features, and its compatibility with your WordPress setup. Popular and effective plugins include WP-Optimize and Advanced Database Cleaner. These plugins can perform a range of tasks, such as cleaning up post revisions, spam comments, transient options, and even optimizing database tables by defragmenting them.
The decision criteria for using a plugin should revolve around its safety features. Ensure the plugin offers a backup option before performing any cleanup tasks, as accidental data loss, though rare, is a possibility. A pitfall to avoid is running optimization tasks too frequently without need; weekly or bi-weekly cleanup is usually sufficient for most sites. For Elementor users, it’s particularly beneficial to optimize your database regularly because the Elementor editor itself relies on efficient data retrieval. A well-optimized database can lead to faster loading of the Elementor editor and quicker saving of your designs. Remember to check the plugin’s documentation for specific recommendations on how to best use its features for your WordPress site.
The Link Between Database Health and Elementor Rendering Speed
The health of your WordPress database has a direct and significant impact on how quickly Elementor can render your pages. When you load an Elementor page, the builder needs to query your database for content, settings, post metadata, and more. If your database is cluttered with old revisions, inefficiently organized tables, or numerous orphaned data entries, these queries take longer to complete. This slowdown translates directly into longer load times for both the frontend of your website and the Elementor editor itself.
Consider this: every time a visitor lands on your page, or when you open a page in the Elementor editor, WordPress executes a series of database queries. If these queries are slow due to a poorly optimized database, the entire rendering process is delayed. This is a critical pitfall: neglecting database maintenance leads to a progressively slower website and a frustrating editing experience. The decision criterion for prioritizing database health is simple: a lean, well-optimized database means faster data retrieval, which directly translates to faster Elementor page rendering. For example, a site with a clean database might render an Elementor page in 2 seconds, while a similar site with a bloated database might take 5 seconds or more. Regularly cleaning and optimizing your database ensures that Elementor can access the data it needs swiftly, providing a seamless experience for both your visitors and yourself.
Leveraging a Fast Hosting Provider and CDN
The foundation of any fast website, especially one built with a powerful page builder like Elementor, lies in its hosting environment and content delivery infrastructure. Choosing a high-performance hosting provider is paramount. Shared hosting plans, while cost-effective, often suffer from resource limitations and “noisy neighbors” – other websites on the same server consuming excessive resources, thereby slowing down your site. Look for managed WordPress hosting or VPS plans that guarantee dedicated resources, faster server response times, and often include built-in caching mechanisms. The difference between a budget shared host and a premium managed host can be the difference between a page loading in 5 seconds and under 1 second. When evaluating hosts, consider factors like server location (closer to your primary audience is better), uptime guarantees, and the availability of features like SSD storage and HTTP/2 support.
Why Hosting Choice is Crucial for Elementor Performance
Elementor, with its drag-and-drop interface and extensive widget library, generates dynamic content and code. If your hosting server is slow to process these requests, the rendering of your Elementor-built pages will be significantly delayed. A slow host can bottleneck even the most optimized Elementor design, leading to increased bounce rates and a poor user experience. Think of it like trying to build a complex Lego structure on a wobbly table; the effort you put into the design is undermined by the instability of the base. Managed WordPress hosting providers typically offer optimized server environments specifically tuned for WordPress, which includes Elementor. They often handle tasks like server-level caching, security, and automatic updates, freeing you to focus on design and content. For example, a site experiencing slow loading times from Elementor could see a 30-40% improvement in page load speed simply by migrating from a basic shared host to a reputable managed WordPress provider known for performance. This initial investment in quality hosting directly impacts every Elementor user’s experience and your website’s overall success.
Understanding Content Delivery Networks (CDNs) and Their Benefits
A Content Delivery Network (CDN) is a geographically distributed network of proxy servers and their data centers. The goal of a CDN is to provide high availability and performance by distributing the service spatially relative to end-users. When a user visits your website, a CDN delivers the site’s content (like images, CSS, and JavaScript files) from the server closest to their physical location. This drastically reduces latency and speeds up page load times, especially for global audiences. Without a CDN, every visitor, regardless of their location, must fetch content from your single hosting server. For an Elementor site rich in media and complex layouts, the benefits are substantial. Key advantages include reduced server load on your origin host, improved website uptime through distributed infrastructure, and significant speed enhancements. For instance, a website with visitors spread across continents can see load times cut by half or more by implementing a robust CDN, ensuring a consistent and fast experience for everyone. Leveraging a CDN is a foundational step for any website aiming for optimal performance.
Integrating CDNs with Your WordPress and Elementor Site
Integrating a CDN with your WordPress site, and by extension your Elementor-built pages, is typically straightforward. Many popular CDN providers offer WordPress plugins that automate the process. Once activated, these plugins will serve your static assets (images, CSS, JS) from the CDN’s distributed servers instead of your origin host. When choosing a CDN, consider factors like pricing, network size, supported protocols (like HTTP/2 or HTTP/3), and ease of integration. Popular options include Cloudflare, StackPath, and KeyCDN. The integration process often involves changing your DNS settings to point to the CDN provider. For Elementor sites, ensure the CDN is configured to cache all necessary files, including those generated by Elementor itself, such as custom CSS and JavaScript. Some CDNs offer features like automatic image optimization and Brotli compression, further boosting performance. A seamless integration means your Elementor components, from advanced sliders to parallax effects, will load quickly for users worldwide, enhancing your overall user experience and conversion rates. You can often find detailed setup guides directly from CDN providers to ensure a smooth transition.
Advanced Elementor Speed Tweaks for the Dedicated Builder
While robust hosting and CDNs lay the groundwork for a fast Elementor website, dedicated builders and developers often need to delve deeper for maximum optimization. These advanced techniques focus on how Elementor’s generated code and assets are loaded and rendered by the browser. Understanding these mechanisms allows for fine-tuning performance beyond general web practices. For instance, Elementor can generate a significant amount of inline CSS and JavaScript. While convenient for page-specific styling, unoptimized loading of these can cause render-blocking issues, delaying the initial display of your content. Strategies such as deferring non-critical JavaScript and extracting critical CSS directly address these bottlenecks. They ensure that the essential elements of your page appear as quickly as possible, creating a perception of speed for the user while the rest of the page loads in the background. These advanced tweaks are particularly crucial for complex Elementor layouts and custom component designs.
Deferring JavaScript Loading: Best Practices for Elementor
JavaScript files, including those generated by Elementor and its associated plugins, can significantly impact your website’s loading speed because they are often render-blocking. This means the browser must download, parse, and execute JavaScript before it can render the rest of the page content. Deferring JavaScript tells the browser to download the script during HTML parsing but execute it only after the HTML document has been fully parsed. This is a critical optimization for Elementor sites, especially when using many interactive widgets or custom scripts. Most caching plugins or dedicated performance optimization plugins for WordPress offer options to defer or delay JavaScript. For Elementor, the key is to identify which scripts are truly necessary for the initial above-the-fold content and which can be loaded later. Be cautious not to defer essential Elementor scripts that are required for the core functionality of your page elements to render correctly. Testing is paramount; after deferring scripts, thoroughly check all page functionality to ensure no interactive elements or critical features are broken. For example, an Elementor-powered testimonial slider might rely on a specific JavaScript file; deferring it incorrectly could prevent the slider from appearing or functioning.
Critical CSS: Delivering Above-the-Fold Content Faster
Critical CSS refers to the CSS rules required to render the visible portion of a webpage (the “above-the-fold” content) on the first page load. By extracting and inlining this critical CSS directly into the HTML’s `
`, you allow the browser to immediately render the essential parts of your Elementor-designed page without waiting for external CSS files to download and parse. This dramatically improves perceived loading speed. For complex Elementor pages with many unique styles, generating critical CSS can be a complex task. Tools and plugins exist that automate this process, scanning your pages and identifying the necessary styles. Elementor itself generates a lot of inline CSS, but some of it might be for elements not immediately visible. The goal here is to isolate only what’s needed for the initial viewport. This technique significantly reduces render-blocking time, ensuring your visitors see a usable, styled page almost instantly. For example, if your Elementor landing page features a prominent hero section with specific typography and a background image, ensuring the CSS for these elements is inlined will make that crucial first impression much faster and more impactful. Regular auditing and testing are necessary to ensure the critical CSS remains accurate as your page designs evolve.Troubleshooting Elementor Performance Issues: A Step-by-Step Approach
When your Elementor-powered website is slower than expected, a systematic troubleshooting process is essential. Start by isolating the cause. First, test your website speed using tools like Google PageSpeed Insights or GTmetrix. These tools will often pinpoint specific issues, such as large image files, unoptimized CSS/JS, or slow server response times. If your hosting and CDN are confirmed to be performing well, the next step is to examine Elementor itself. Disable all plugins except Elementor and see if performance improves. If it does, re-enable plugins one by one to identify the culprit. Often, conflicts arise between Elementor and other third-party plugins, especially those that also modify page structure or add scripts. Another common issue is overly large images; ensure all images used in your Elementor designs are optimized for the web. Review your Elementor settings; sometimes, features like CSS print methods or JS file generation can be toggled for performance gains. Finally, consider if your Elementor template or page structure is overly complex. Too many complex widgets, parallax effects, or animations on a single page can strain resources. Simplifying your design or breaking down very long pages can yield significant improvements. Remember, consistent testing after each change is crucial to track progress and confirm fixes.